Low Carbin’ at Red Robin

Sorry I haven’t been around in a while. Haven’t really been doing that much new or exciting in the past few months, but just recently got a bit of news that is making me realize how helpful having this blog and making myself post to it regularly is.

You see, a couple of weeks ago, I finally received the definitive diagnosis I’d been dreading: Type II Diabetes. There’s a genetic factor, yes, but there’s also a lifestyle factor. Right now, my A1C (long-term glucose) is 0.1 over the threshold for diabetes, so I’m going to be getting back on track with making low-carb my food life from now on. I’ve also joined a gym and signed up for weekly sessions with a personal trainer for the next year.

Because of the diabetes diagnosis, I’m now in a situation in which I can no longer have the lazy, incorrect attitude of well, I can cheat today and just get back on it tomorrow. No. There is no more cheating.

Which makes figuring out what to eat when going out with everyone from the office that much more fun. Because they wanted to accommodate me (but everyone wanted burgers), they left the choice of restaurant up to me. And I chose Red Robin.

Not the first place you’d think of when living a low-carb lifestyle, right? But I knew from having played around on their website before that they allow (and somewhat encourage) customizations of their sandwiches—and have substitutions for the side available at no upcharge. So before we went, I hopped onto the website and pre-planned my meal so that I didn’t even have to look at the tempting photos in the menu.

Low-Carb, Non-Salad Lunch at Red Robin
Low Carbin' at Red Robin

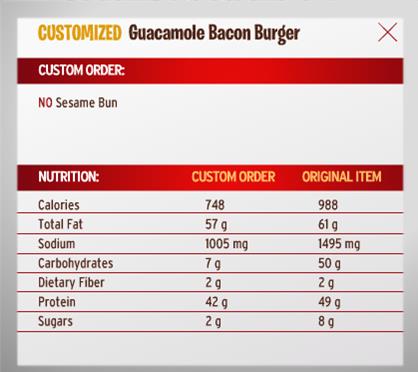
After perusing the menu on RR’s website, I decided to investigate my favorite burger, the Guacamole Bacon Burger. It’s a regular burger patty with cheese, bacon, guacamole, mayo, lettuce, and tomato. No special sauces for hidden sugars. Without the bun, here’s the nutritional info, from the RR website:

Red Robin Guacamole Bacon  Burger with NO BUN

You can also get it with a “lettuce wrap”—a coworker ordered hers that way, they they literally had her patty and its toppings sitting on what looked like half a head of iceburg. It was probably the quarter wedge that they serve with blue cheese dressing as an appetizer. Just be sure to account for the extra carbs (2 g net carbs for that much lettuce, according to the nutritional values given for the appetizer—without all of the toppings/fixings/dressing).

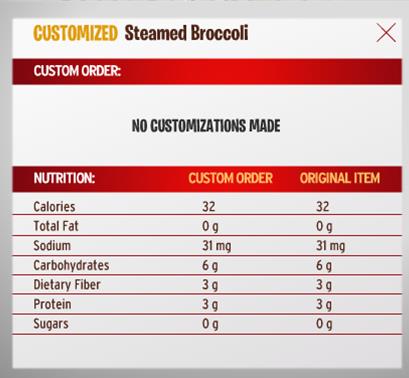
One of the things that’s hard to pass up at RR are their “bottomless” steak fries or their wonderful onion rings. But while it’s a mental and emotional sacrifice to bypass those, at least RR offers a free substitution of a side salad or steamed broccoli for the fries. I got the steamed broccoli:

Broccoli

So, for a total of 8g net carbs (and only 2g sugars), I had a wonderful, satisfying meal with my coworkers and didn’t walk away feeling like I’d been short-changed or had to “settle” for something I didn’t really want. And considering that if I’d gone the “all I can eat at a burger place is a salad” route, I’d have ordered something that has a total of 21g net carbs (the Avo-Cobb-o Salad), I’m glad I decided to plan ahead and research my options.

Posted in Food Journal | 4 Comments

Low-Carb Lifestyle #Recipe: Coconut-Curry Shrimp

I’m a curry novice—and the ones I’ve had have been Thai influenced rather than Indian. So that’s why this recipe struck my fancy.

And . . . O. M. G. was it YUMMY!

Coconut-Curry Shrimp

Ingredients:Low-Carb Lifestyle #Recipe: Coconut-Curry Shrimp | @LowCarbKaye

  • 1 14-oz can coconut milk
  • 1.5 tbsp curry powder
  • 1 clove garlic, crushed
  • 1 tsp chili garlic paste
  • 1–1.5 lbs large shrimp, shelled (thawed and drained, if purchased frozen)
  • 1 tbsp fish sauce
  • 2 tsp Splenda
  • 3 scallions, sliced thin
  • ¼ cup chopped fresh cilantro

Tools & Utensils:

  • Large skillet
  • Measuring spoons
  • Knife/cutting board for scallion, cilantro

Directions:
Starting with a cold (i.e., not pre-heated), large stillet, combine coconut milk, curry powder, garlic, and chili-garlic paste. Place on medium-low burner and bring up to a simmer. Simmer 7 to 10 minutes, stirring occasionally. If sauce begins to boil, reduce heat. (The sauce needs to cook this long to cook out the “powder” of the curry powder.)

Add shrimp, fish sauce, and Splenda. Stir until fish sauce and Splenda are well incorporated and shrimp are coated. Simmer an additional 5 to 7 minutes, or until shrimp are cooked through but not overcooked. Stir in scallions, let simmer about a minute. Serve topped with chopped cilantro.

1 lb. shrimp makes 3 servings.

Low-Carb Lifestyle #Recipe: Coconut-Curry Shrimp | @LowCarbKaye

Nutritional Info (per serving)
Calories: 200
Fat: 8.5 grams
Carbs: 8 net grams

___________________________________________

I only had a 10-ounce package of shrimp, so I had a lot of sauce left over. Yay!!! Not sure what I’m going to use it for, but—YAY! This was so good! Next time, I’ll add a lot of vegetables to it and make it more of a main dish rather than just a few shrimp. Even with a side of Sautéed Bok Choy, I was still hungry afterward.

While this does take a while to cook (thus my being extremely hungry when I finally sat down to eat), it was so good it’s definitely worth the time.

Posted in Food Journal, Recipes | 4 Comments

Low-Carb Lifestyle #Recipe: Sautéed Bok Choy

I’m back!

Welcome to all of my new followers. I know that I’ve gotten tons of hits from a few of my pins on Pinterest, so I’m thrilled that once you visited, you decided to subscribe. Thank you.

I haven’t posted anything new in quite some time because I haven’t had the motivation (a) to cook or (b) to stick to low-carb when I did. One of the problems in dealing with depression is the difficulty in managing household tasks. And that means that it makes it really difficult to motivate myself to clean up after cooking, which means I either have a filthy kitchen or I don’t cook. I choose the cleaner route.

The other problem in dealing with depression is that when I’m not eating healthfully, my depression worsens. So it’s a double-edged sword. However, now that the gorgeousness that is fall weather has arrived, there’s been a lifting of my mood, which means more motivation to do more, both inside and outside of the house—which also means COOKING! I’ve still been collecting low-carb recipes I want to try, so hopefully from now on, I’ll have at least two or three new ones that I’ve tried out to post each week. So let’s get started, shall we?

Sautéed Bok Choy

Ingredients:Low-Carb Lifestyle #Recipe:  Sautéed Bok Choy | @LowCarbKaye

  • 1 medium bunch bok choy, rinsed and well drained
  • 1 tablespoon vegetable oil
  • 1 clove garlic, minced
  • 1/2 teaspoon freshly grated ginger
    (I used scant 1/4 tsp powdered ginger)
  • Pinch red-pepper flakes (up to 1/4 teaspoon depending on how hot you like it)
  • 1/2 tablespoon low-sodium soy sauce
  • 1/2 tablespoon water
  • 1/8 teaspoon sesame oil
  • Salt, optional

Utensils/Tools Needed:

  • Good knife and cutting board
  • Medium skillet with lid
  • Tongs

Directions:
Gather and measure all ingredients and tools before starting prep.

Put oil in skillet and place on stove over medium-high heat. While that is heating, cut off end of bok choy and cut into 1.5- to 2-inch pieces (smaller at the thicker part at the bottom, larger as you get toward the crown), and cut the green leafy part into ribbons. Set aside.

Once oil is hot and glistening in the skillet, add garlic, ginger, and red pepper flakes. Cook, stirring constantly, until fragrant but not browned, about 30 seconds. Add bok choy (be careful—any water remaining on them will pop in the oil) and stir to coat with the oil. Cook, stirring, about 1 minute.

Add soy sauce and water then cover and cook/steam about 1 minute.

Uncover and continue cooking about 2 minutes, or until most of the liquid has cooked off and thickest pieces are crisp-tender. Remove from heat and add sesame oil, stirring to combine. Season with salt, if needed.

Low-Carb Lifestyle #Recipe:  Sautéed Bok Choy | @LowCarbKaye

Makes 2 servings.

Nutritional Info (per serving):
Calories: 99
Fat: 7.5 grams
Carbs: 3.5 net grams

__________________________________________

This was my first time working with/eating bok choy. While it’s easy enough to prepare, I can’t say I’m a fan—it’s a little too bitter for me. I may try this with either Napa or regular green cabbage, though.

And a splash of acid—a twist of lemon or lime juice—probably wouldn’t go awry with this either.

It was good on its own, but it was fabulous with the sauce from the coconut-curry shrimp I also made. Stay tuned for that recipe tomorrow!

Posted in Food Journal, Recipes | 5 Comments

Low-Carb Lifestyle #Recipe: Green Chile Cheeseburger Meatballs

Last night, I revisited The Most Delicious Meatballs in the World (and, yes, just as delicious the second time around!).

And after making the Bacon-Wrapped Green Chile Cheeseburger, I came up with the idea to try to combine the two.

And at this point, I have to thank my mother for teaching me not to be afraid of trying new things in the kitchen and for making me taste foods before saying “yuck”—because it taught me what I like and don’t like and what flavors work well together.

While this recipe isn’t yet perfected, I wanted to go ahead and share it, along with the changes I’ll make next time, because they still turned out quite yummy!

Green Chile Cheeseburger Meatballs

Ingredients:20140708_191213

  • 3 large eggs
  • 1/2 cup grated (powdered/dry) Parmesan cheese*
  • 2 tsp salt
  • 1/2 tsp black pepper
  • 2 tsp onion powder
  • 2 tsp garlic powder
  • 1/2 cup chopped green chile (fresh or frozen and drained)
  • 1 small (2.3 to 3 oz) package real bacon bits
  • 8 ounces cheese, grated
  • 1 pound ground beef (80/20 preferably)
  • 1 pound ground pork

Utensils/Tools Needed:

  • Potato Masher
  • 9 x 11-inch baking pan, with at least 2″ sides
  • large mixing bowl
  • measuring spoons and cups

Directions:
Preheat oven to 350°F (toaster oven 400°F). Line a 9×11-inch baking dish (with at least 2-inch-high sides) with foil. Or use a disposable aluminum pan. (I’m all about the easy cleanup, which is why I always line pans with foil or use disposable pans.)

In a large bowl, lightly beat eggs. Add parm, spices, chile, bacon bits, and cheese, and mix together well.

*I kept the Parmesan cheese from the original recipe to act as a binder, since there are no breadcrumbs. I probably didn’t need this, though.

Add meats and, using the potato masher, mix until all ingredients are just combined. Do not overwork this or the meatballs will come out tough. (I used the potato masher instead of my hands for two reasons: first, it’s more sanitary; second, it keeps the ingredients colder, and thus the fats solid, until ready to form the meatballs.)

When combined, separate mixture into eight equally sized portions. This time, I pressed the meat into a small rectangular pan, smoothing it until it was even and then used a knife to cut it into eight relatively equal pieces. A large ice cream scoop (one of the perfectly round ones) would be great for this, too. Again, be careful not to overwork the meat. These will be LARGE meatballs.

Place meatballs in pan as you finish forming them. It’s okay if they touch, they’ll shrink up some as they cook.
20140708_193952

Bake, uncovered, 40–50 minutes. There will be a lot of “juice” in the pan, so be very careful when removing it from the oven. (If you want, around the 25–30 minute mark, you can take it out and drain off some of the fat.) Unfortunately, a lot of the cheese cooked out, so the final product isn’t as cheesy as I’d hoped.
20140708_202910

Serve piping hot, topped with more cheese or salsa or cheese sauce or even between two lettuce leaves with tomato, onion, and pickle, if desired.

20140708_203245

Nutritional Info (per meatball):
Calories: 475
Carbs: 1.5 net gram

For a meal later this week, I’m going to eat these smothered with queso with a side of Zucchini Chips.

______________________________________________

Changes I’ll Make Next Time:
Instead of grating the cheese, I’ll cut it into half-ounce cubes and form the meatballs around them—that way, the exterior of the meatball will be somewhat cooked (crusty) before the cheese starts melting. I will also nuke the bacon bits to get them crisp before stirring them in with the rest of the ingredients—because they didn’t crisp up in the cooking process and give the bacon texture that I’d hoped for.

I might also try these another time with a can of Rotel instead of just the plain green chile.

Posted in Food Journal, Recipes | 1 Comment

Low-Carb Lifestyle #Recipe: Zucchini Chips

After fighting with my old, cheap mandoline when I made the cucumber salad the other day, I decided it was time to take some of my hard-earned adjunct teaching money and put it toward a better piece of equipment. And, boy howdy, did reading those reviews on Amazon pay off!

Here’s what I ended up getting.

So, of course, I immediately had to find something to slice. Thank goodness I’d already gotten some zucchini to try making chips with.

Ingredients (for 2 servings):Ingredients
1 large green zucchini
non-stick cooking spray
Salt and pepper

Tools/Utensils Needed:
Every baking/cookie sheet in your house
Aluminum foil (to line the sheets)
Mandoline (or a very sharp knife and really good cutting skills)
Container for “catching” the slices from the mandoline

Directions:
Preheat oven to 225-230°F. Line baking sheets with foil.

Remove the stem from the zucchini and slice into thin medallions with the mandoline. Spray foil-lined baking sheets with non-stick cooking spray. Lay out zucchini medallions side-by-side on baking sheets. It’s fine if they touch, but do not overlap.
Before Cooking

Once all are laid out, spray lightly on top with more cooking spray, then sprinkle lightly with salt and pepper. Because these will shrink quite a bit, you don’t want to overdo it with the seasonings.

Place all pans in the oven and bake (dehydrate) approx. 2.5 to 3 hours.

Baked Zucchini Chips

The image above gives you an idea of how much these shrink, but here’s the side-by-side:
Before & After

Let the chips cool, and, if not serving/eating immediately, store in an air-tight container.

Zucchini Chips

I think when I try these again later this week (for a road-trip car snack), I’ll use the thicker slice setting on the mandoline, as these were so thin they were hard to get off the foil when it came time to remove them from the pans. They stayed crisp overnight in a sealed plastic container, and have been a great snack to have at my desk today.

Nutritional Info (for 1 serving–half this recipe):
I’ll admit, I’m not sure how to adjust the nutritional info for something that’s been dehydrated like this, so this info is based on 5 oz. pre-cooked weight
Calories: 22
Net Carbs: 3 g

Posted in Food Journal, Recipes | 1 Comment

Low-Carb Lifestyle #Recipe: Crispy Baked Cajun Chicken Wings

While folding laundry earlier this afternoon, I started thinking about what I’d do for dinner tonight. I remembered I had a bag of chicken “drumettes” in the freezer (you know, the kind that are already frozen when you buy them). Instead of just taking them out and letting them sit to thaw, I decided to brine them. And the easiest way to brine something is to add a bunch of Tony Chachere’s seasoning (I’m partial to the More Spice)

Chicken Wings in Brine

Ingredients (for 1 serving):Ingredients
8 chicken drumettes
1 quart water
3 tablespoons Tony’s More Spice + more for seasoning
1 tablespoon cooking oil

Utensils/Tools needed:
Large bowl/container (for brining)
gallon-size plastic bag
Baking sheet with wire rack
Aluminum foil or parchment paper
Non-stick cooking spray

Directions:
Starting either fresh or frozen, add chicken wings, water, and 3 tablespoons spice mixture to the storage container and cover (using a lidded container makes this easy). If chicken is fresh, place in fridge for at least 1 hour. If chicken is frozen, leave out on counter until chicken is thawed but water is still chilled. Either use immediately or place in fridge to continue brining.

Preheat oven to 425°F.

Remove wings from brine and pat dry. Add wings and cooking oil to plastic bag and smoosh around until wings are coated with oil. Line baking pan with foil and add cooking rack; spray rack with non-stick spray. Remove wings from bag and lay out on rack. Sprinkle all sides with seasoning. Bake 40-45 minutes until chicken is cooked through. If skin is not crisp enough, turn on broiler for about 5-10 minutes.

Serve immediately.

Crispy Cajun Chicken Wings

Nutritional Info:
Wings: approx. 400 calories, 0 carbs

Enjoy as they come out, or serve with your favorite dipping sauce—but don’t forget to count the calories/carbs!

Posted in Food Journal, Recipes | 3 Comments

Low-Carb Lifestyle Recipe: Bacon-Wrapped, Jalapeno and Cream Cheese Stuffed Chicken

A few weeks ago, I made a low-carb version of Chicken Cordon Bleu as a way to dress up just plain-ol’ baked chicken for dinner. I’ve decided that pounding out chicken breasts isn’t too difficult—and is, in fact, fun and stress relieving—so I’ve been on the lookout for other “stuffed” chicken recipes.

This time, I wanted something a little more flavorful, and what’s more flavorful than jalapenos? Well . . .

Bacon-Wrapped, Jalapeno and Cream Cheese Stuffed ChickenIngredients
Ingredients (for 2 servings)

  • 1 medium- to large-size fresh jalapeno
  • 4 to 6 slices bacon
  • 1 tablespoon olive oil
  • 1 clove garlic, minced; or 1 teaspoon prepared minced garlic
  • 4 oz (half a block) cream cheese
  • 2 tablespoons cheddar cheese
  • 2 six- to eight-ounce boneless, skinless chicken breasts
  • Salt and pepper to taste

Utensils/Tools Needed

  • Good, sharp knife for chopping
  • Medium, heavy-bottomed skillet
  • Paring knife for seeding jalapeno
  • Cutting board/mat
  • Thor’s Hammer (meat mallet)
  • Gallon-size zip-top bag
  • 8×8 or 9×9 baking dish
  • toothpicks or skewers

Directions
Preheat oven to 350°F.

Cut the top/stem and very bottom point off of the jalapeno, then cut into quarters lengthwise. Using the paring knife, carefully remove the seeds/white membranes (this is where the heat resides in the pepper, so if you want more heat, leave more of the white membrane in tact). After seeding, slice the pieces lengthwise into thin strips, then chop these into small pieces. Set aside.

In the skillet, over medium heat, partially cook the bacon. It shouldn’t have much color, but it will be starting to get slightly crusty around the edges. You want it to still be flexible enough to wrap around the chicken.
Partially cooked bacon

Remove bacon from pan onto paper towels to drain. Add olive oil to bacon drippings (still on medium-heat stove burner). Place jalapeno and garlic in hot oil and sauté, stirring constantly, 2 to 3 minutes. Add cream cheese and cheddar; stir until cheeses are melted. Pour cheese mixture into a bowl and set aside to cool while preparing the chicken (you may need to drain off any excess oil/fat).

[Don’t forget to turn the stove off and remove the pan from the hot burner.] 😉

Place one piece of chicken in the zip-top bag and, with the smooth side of the meat mallet, pound out to about 1/3-inch thickness (this is known as a paillard). Repeat with second piece.

Chicken Paillards

Sprinkle chicken with salt and pepper, then spread half of cheese mixture inside each paillard, leaving about a 1/4 inch margin all the way around to prevent the filling from squirting out the ends.

Stuffing the Chicken

Carefully roll up the chicken, with the cheese inside. Wrap with bacon and secure with toothpicks/skewers and place in 8×8- or 9×9-inch baking dish.

Bake about 30 minutes or until chicken juices run clear.

Finished product

Let sit about five minutes before serving.

Bacon-Wrapped, Jalapeno and Cream Cheese Stuffed Chicken

Nutritional Info for 1 serving (1 whole breast/roll)
Chicken: 235 calories, 0 g carbs
2 ounces cream cheese: 198 calories, 1.5 g carbs
1 tablespoon cheddar cheese: 51 calories, 0.75 g carbs
1/2 jalapeno: 2 calories, 0.2 g net carbs
1/2 teaspoon minced garlic: 2 calories, 0.4 g net carbs
2 slices low-sodium, no sugar added bacon: 80 calories, 0 g carbs
Totals: 568 calories, 2.85 g net carbs

I ate it with 2 tablespoons homemade guacamole (1/4 avocado + 2 teaspoons salsa = 71.5 calories, 1.3 g net carbs), and a serving of the Cilantro Lime Cucumber Salad I made the other day (103 calories, 2 g net carbs).

You’d think that with the garlic and jalapeno, it would be plenty flavorful, right? Wrong. Bland, bland, bland. Thank goodness for the guacamole!

Changes I Will Make Next Time

  • I will chop up the bacon into bite-sized pieces and cook it through to incorporate it into the filling.
  • I will sweat about 1/4 cup onions in the bacon drippings before adding the jalapeno and garlic. Onion would add more flavor to this.
  • I will use 1/4 cup of sharp cheddar. Two tablespoons of mild didn’t add any flavor.
  • I will try it with green chiles instead of jalapenos.
  • I will cut each roll in half for a serving. A whole one of these was way too much food even with just the cucumber salad as the side.
  • I will drizzle the chicken with melted butter before baking.
  • About 5 minutes before it’s finished cooking, I will add a sprinkle of cheddar or Monterey jack cheese on top of the chicken.
  • I will give it a different name since I’m changing so much about the recipe.
Posted in Food Journal, Recipes | 1 Comment

Low-Carb Lifestyle Recipe: Cilantro Lime Cucumber Salad

It’s really hard, especially in the summertime, to come up with side dishes with a Mexican flavor that aren’t heavy on the carbs (beans, rice, corn, etc.). I had to search high and low for this one (and finally found it on my own Recipes I Want to Try board on Pinterest).

Cilantro Lime Cucumber Salad

IngredientsIngredients (for 2–4 servings):

  • 1 fresh jalapeno
  • 1 clove/teaspoon minced garlic
  • 1.5 to 3 tablespoons lime juice
  • 1/4 teaspoon crushed red pepper
  • 1/2 teaspoon salt (more to taste)
  • black pepper, to taste
  • 1.5 to 3 tablespoons olive oil
  • 1 large cucumber
  • 2 tablespoons minced fresh cilantro (or to taste)

Utensils/Tools Needed:

  • Medium to large plastic storage container with lid
  • Good, sharp knife for chopping
  • Paring knife for seeding jalapeno
  • Cutting board/mat
  • Measuring spoons
  • Mandoline

Directions:
Cut the top/stem and very bottom point off of the jalapeno, then cut it into quarters lengthwise. Using the paring knife, carefully remove the seeds/white membranes (this is where the heat resides in the pepper, so if you want more heat, leave more of the white membrane in tact). After seeding, slice the pieces lengthwise into thin strips, then chop these into fine pieces. Put in plastic storage bowl. Add garlic, lime juice, red pepper, salt, black pepper, and olive oil to container (start with 1.5 tablespoons of the lime juice and olive oil—use additional only after the recipe is finished and you’ve had time to taste it). Seal lid tightly and shake vigorously until all ingredients are well combined.

Using a very sharp knife or mandoline, carefully slice the cucumber into thin, flexible slices. My mandoline doesn’t have an adjustable blade, so I wasn’t able to get mine as thin as I wanted (the recipe I used showed theirs as being almost transparent, they were so thin), but it still worked. If you want to skin your cucumber before doing this, feel free. Add cucumbers to dressing in the plastic container.

Cut off the bare stems of the cilantro. Then, bunching the leaves together as much as possible, finely chop the cilantro until you have approximately 2 tablespoons. (I didn’t get mine chopped as finely as I should have. I’ll try harder next time.) Add cilantro to container with other ingredients.

Seal the container and shake vigorously (turn it upside down several times, too) to make sure all cucumber pieces are coated with the dressing. Taste and add more seasonings/lime juice/olive oil at this point if desired. I found it needed more lime juice, salt, and heat. So I added another tablespoon or so of lime juice and several generous shakes of Tony’s More Spice.

Let sit in the fridge at least 30 minutes if not several hours. The longer it marinates, the more flavor the cucumbers absorb. Let sit out at room temperature at least 30 minutes before serving.

Cilantro Lime Cucumber Salad

Nutrition Info:
(per serving, based on 4 servings with 3 Tbsp each of lime juice and olive oil)
Calories: 103
Fat: 10 g
Net Carbs: 2 g

Posted in Food Journal, Recipes | 1 Comment

Low-Carb Lifestyle Recipe: Brined, Oven-Roasted Pork Chops

Y’all . . . this was SO good, I’ve vowed that I’ll never make pork chops without brining them ever again! And do you know how difficult it is to find a brine recipe that’s sugar-free? Well, I’m about to remedy that.

Brined, Oven-Roasted Pork ChopsBrine Ingredients

The pork chops will need to brine for at least 1 hour and up to 24 hours, so start early enough to allow them to soak up the flavor!

Ingredients:

  • 3–4 thick-cut pork chops (at least 1-inch thick)

For Brine:

  • 1 quart cold water
  • 1/4 cup kosher salt
  • 1 tablespoon minced garlic
  • 1 tablespoon (dry) minced onion
  • 1/2 tablespoon red pepper flakes
  • 1 teaspoon thyme
  • 1 teaspoon rubbed sage
  • 1/2 teaspoon ground cumin seed

Tools/Utensils Needed:

  • Large bowl for brining
  • Cast-iron or heavy-bottom skillet . . . and/or . . .
  • Grill/broiler pan

Directions:
Combine water and seasonings (salt, garlic, and onion are pretty much mandatory—everything else depends on what you have on your spice rack and what your favorite flavors are; it’ll be pretty mild in the finished product). Add chops to the brine, cover with lid or plastic wrap, and place in refrigerator for at least 1 and up to 24 hours.

When ready to cook:
20140517_192817Preheat oven to 400°F. Heat skillet on stove over high heat or, if using an oven-proof skillet, you can put it in the oven while it’s heating up. Remove chops from brine and pat dry. DO NOT RINSE. You can add more seasonings at this point if you’ve done this before or if you’ve brined for an hour or less (the longer you brine, the more flavor the meat picks up). I only brined for an hour, so I sprinkled a little dry Italian dressing mix on them. Sear chops in hot skillet for about 3 minutes on one side.

If using cast-iron or oven-proof skillet:
20140517_193248If using cast iron or oven-proof skillet, turn chops over and place skillet in oven. The recipes I read that used this method said to roast at 400°F for 6 to 10 minutes. This method will have a shorter roasting time due to the pan’s already being hot.

How I did it:
Because I don’t have a cast-iron or other oven-proof skillet, I used a regular skillet heated on the stove over high heat. When it was very hot, I seared the chops on both sides (about 90-seconds to two minutes each side) and then put in the oven on my make-shift grill pan (a wire rack that fits inside a shallow baking pan, which is, of course, lined with foil). I roasted the chops for 10 minutes at 400°F, then turned the broiler on for five minutes.

20140517_200435

Nutritional Info for 1 serving (1 chop, about 6 oz. pre-cooked weight):
Calories: 218
Carbs: 0

With 1/2 cup turnip greens: Add 20 calories and 2 net grams carbs

Posted in Food Journal, Recipes | 1 Comment

Low-Carb Lifestyle Recipe: Bacon-Wrapped Green Chile Cheeseburger

I grew up in New Mexico, but moved away after high school graduation. And one of the things I miss is green chiles on everything. Notice the spelling of that word: CHILE. When talking about the most famous product of the state of New Mexico, there is no second I. The word chili refers to the stuff that’s made with beans, meat, tomato sauce and, yes, chili powder.

Bacon-Wrapped Green Chile CheeseburgerBacon-Wrapped Chile Cheeseburger Ingredients
Ingredients (for one serving):

  • 1/3 lb. ground beef
  • 1-2 tablespoons chopped onion
  • 1-2 tablespoons chopped green chile
  • Salt and pepper, to taste
  • Approx. 2 oz shredded cheddar
  • 4 slices bacon

Utensils/tools needed:

  • Bowl (for meat mixture)
  • Plate (for forming patty)
  • Knife or kitchen scissors
  • Grill pan, broiler pan, or wire rack in a regular, foil-lined pan

Directions:
Preheat oven to 400–450°F (hotter for crisper bacon). In the bowl, combine meat, onion, green chile, salt, and pepper. I used frozen chopped onions, which helped keep the meat cold while I was handling it.

Remove about 2/3 of the meat from the bowl and roll it into a ball. Place ball on plate, then, using a bowl or cup, or just your hands, press the meat down into a patty with a rim:

.

Make sure the edges are the same thickness and height all the way around for even cooking. Place cheese in the well (and more green chiles if you like).

.

Then, roll the last 1/3 of the meat into a ball before pressing into a patty with even thickness to form the “lid” for the stuffed burger.

Cut the bacon slices in half lengthwise, then lay out in a grid on a flat surface as so:

(I ended up needing to move the horizontal and vertical slices closer together.)

Place the patty on the crossed bacon slices, then alternating sides, wrap the slices around to the top of the burger. You can try making it prettier than I did, but just make sure that most of the pieces of bacon are tucked under another to make sure they don’t slide off during cooking.

.

Transfer to pan and roast for 25 minutes.

.
Turn oven to broil and let cook until bacon is desired crispness. Let sit for five minutes and then ENJOY!

Posted in Food Journal, Recipes | 2 Comments